Say goodbye to coding woes and hello to effortless email creation. Whether you’re a seasoned marketer or just starting to work with emails, this guide will walk you through the steps to crafting compelling email campaigns that resonate with your audience.
How to Build a Dynamic Email Flow
Imagine effortlessly designing a captivating email flow that engages your customers and compels them to take action. That’s precisely what the Bloomreach email visual builder empowers you to do. Let’s dive in and see how you can create an impactful email campaign step by step.
Step 1: Setting the Stage
To start your email journey, head to the “Campaigns” section and navigate to “Scenarios.” Click on “Create New” to embark on your email creation adventure. Our goal is to design a scenario that involves sending an initial email to your customer base, followed by a secondary email that entices them to act.
Step 2: Crafting the Email Flow
Next, let’s plan the flow based on how your customers respond to the initial email. If they engage with the first email, they’re offered a special discount on a product they’ve shown interest in. If they don’t open the initial email, the second one informs them about the irresistible offers they’re missing out on.
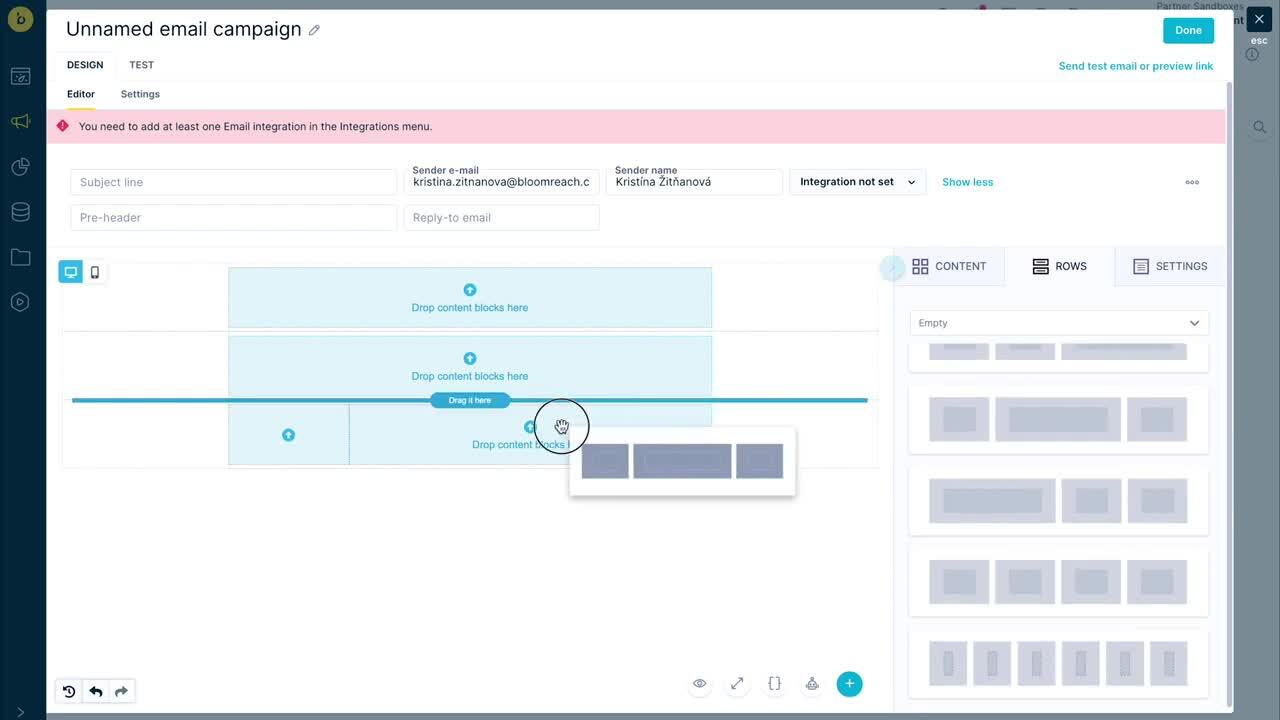
Step 3: Navigating the Visual Builder
Double-click on the email node to access the visual builder. This powerful tool consists of two main sections: the editing region and the tabbed panel. The editing region is where you create your email’s layout, while the tabbed panel offers a variety of elements that you can drag and drop into the editing region.
Step 4: Designing the Layout
Begin by dragging and arranging row elements to structure your email. These rows will serve as the framework for the content you’ll add later. What’s more, you can set specific conditions for each row, ensuring they’re shown only to specific user groups.
Step 5: Adding Content
Your email’s content is where the magic happens. From text and images to social links and dynamic content, the “Content” tab offers a plethora of elements to choose from. This flexibility allows you to customize your email design to perfection.
Step 6: Global Settings
Fine-tune your email’s global parameters in the “Settings” tab. Adjust the content area’s width, background color, and more using intuitive sliders and input fields. Tailoring your email’s look and feel has never been easier.
Step 7: Personalization and Beyond
The visual builder doesn’t stop at design — it extends into personalization. Edit each element’s properties to craft a personalized experience for your recipients. Preview your email on different devices, revert changes if needed, and explore advanced options like adding multilingual versions.
Step 8: Unlocking the Power of Jinja
Take your email personalization to the next level with Jinja code. Personalize subject lines, content, and more to cater to each individual customer. Dive into Jinja documentation or courses to comprehensively understand this feature’s potential.
Step 9: Fine-Tuning and Preview
Once your email masterpiece is complete, review and preview it for different customers. Explore additional features within the “Email Campaign” section, such as A/B testing and campaign evaluation, to optimize your email’s impact.
Conclusion
Congratulations! You’ve now mastered creating captivating email campaigns using the email visual builder. With its intuitive interface, customizable elements, and advanced personalization options, you have the tools to engage your audience and drive meaningful actions. And if you want even more insights and resources, check out our use cases and documentation. So what are you waiting for? Craft your next email masterpiece, and watch your marketing efforts soar to new heights!
Ways To Use Bloomreach Engagement’s Visual Email Builder
Personalize Automated Newsletters With Relevant Content and Dynamic Product Recommendations
Transform your newsletter from good to great with personalization.View Use Case
Personalize Newsletter With Items From a Customer’s Favorite Category
Add an engaging touch to your regular newsletter by showcasing items within a customer’s most-loved category that they haven’t purchased yet. View Use Case
Reengage Inactive Customers Through an Omnichannel Win-Back Campaign
Create a win-back campaign that’s consistent across web, mobile, and email. Then, leverage customer data to personalize messages, A/B test, and optimize based on real-time interactions. View Use Case
Use the AI Content Generator To Quickly Come Up With Creative and Engaging Copy for Email, App, or SMS
Generate highly engaging content in seconds, while achieving true personalization at scale even faster. View Use Case
Target Ads to Audiences Who Haven’t Opened an Email or SMS
Capture missed conversion opportunities by retargeting audiences who haven’t opened emails or SMS through ads and social media. View Use Case

Get Started with Bloomreach’s Email Marketing Tool
Elevate your email marketing with advanced segmentation, WYSIWYG lifecycle campaigns, and Loomi-powered personalization without sacrificing deliverability and ease of use.